
Categories
- Design Tips (1)
- Design Tutorials (1)
- Uncategorized (352)
Hi Brooke! We are actually working on a full mudroom guide, and will be sharing that in the next couple weeks. The supply list varies based on the type of mudroom you are looking to build but we will have a comprehensive list for every type you can imagine!
Fantastic! Hoping this is still in the works! Great job.
This is such an amazing built in! I just Iove how much functional space you have included to area.
All the extra function in this space. We keep saying that’s the theme for sure.
No idea how you’re going to top this!! NOw I’m seriously looking forward to the final reveal!
I love how the bench top meets at the corner, I didn’t see that on the full reveal page. Can you tell me what size pieces of wood you used for the bench top? Everything looks so functional and beautiful!
Thank you! For this particular build I used 1 x 5 red oak and built the seat on site atop the base. I typically build my seats to spec in the shop by joining my wood together with biscuits, glueing the seams and sanding down for a smooth finish. This project was a bit different seeing as I decided to build on site due to our shop not being ready yet…but it worked! The end result looks super clean and is very functional.
How much wider are your cubbies than your baskets? Looks like you added 2-3″ to the H & W. What about the depth?
Thanks.
Additionally, what thickness plywood did you use? 3/4″?
Thanks again,
I always use 3/4″ plywood. And in 95% of my builds I use smooth red oak plywood. When painted, the grain adds additional depth and character to the space. Red Oak plywood also holds stain very well.
– Michael
Hi Mike!
We always like to leave a good 2-3″ on either side and top of the basket, for a couple of reasons. First, it allows for some room to grab with your hands, especially when the baskets are higher (especially for children as the grow). And second, leaving room eliminates quick wear and tear on the sides of the cubbies. Over time the use is inevitable but this gives additional life to the space. As for the depth, it always depends on the space and use. This particular builtin is 16″ deep and the baskets are 14″. After we take measurements of a space we always sketch out options, as well as source baskets that make sense for the space prior to proposing a final design solution to clients. Hope this helps!
– Michael
I am currently deciding on built ins for my mudroom and am worried about my baskets being too high. What it the length from your floor to the height of your first shelf?
Hi Molly!
Every built-in we do is custom to the home and its owners. We want to make sure that the first shelf (at least) is accessible without a stool or ladder to assist. We would recommend that you measure how high you can comfortably reach in order to grab a basket, and subtract a few inches from that just to be sure. There is no right or wrong answer here…it all depends on your comfort.
Hi there!
How wide are your cubbies? We are a family of 5 and trying to configure our space to accommodate, but making sure the function/spacing is practical. Thank you
Cheers,
Gia
We always build all of our cubbies to spec based on the size of bins we are using above. However in this one they are 14 inches wide. Hope that’s helpful!
Thanks,
Danielle
Hi I’m trying to take measurements based on dimensions of baskets online. (Since I cant go to the store right now to stand around and play with them #covid)I like the look and contrast of yours and I have the wire baskets in another space in my house so I figured it would accent nicely. I’m wondering though, if I’m reading something wrong or if you have a different size basket linked than what you used. If your shelf is 16″ deep by 14 wide, the linked baskets you have are the large ones at 17x17x 14 and the wire ones at 12x17x6. And they are sideways at 17. Somethings just not adding up. Help!
Hi Amanda!
I am so sorry for the confusion here. I was incorrect with the dimensions I left in the comments a while back. The depth is actually 18, and the width 18 as it is a cube design. Total typo over here…we will change that!
Thank you for calling that out!
M
Hey there! This turned out beautifully!!! I’m curious what color of paint you used! It’s such a beautiful bright white! Did you prime and then paint? Would you recommend a sprayer when you are painting everything?any recommendation on a sprayer?
Thank you!!
Hi Analisa,
Thank you so very much. The paint we used in the entire mudroom is Origami White SW 7636. We always prime and paint all our built ins. We do recommend a sprayer. Our favorite from Graco. This is Graco Pro210ES is our newest addition. We also have Graco TC Pro Cordless. Hope this helps!
Danielle + Michael
How wide is your space? From wall to wall?
I have just purchased the same hooks used here. We are turning a closet into a “mud room” and am curious as to whether or not the hooks are secured into the wall studs. We also have shiplap but my husband is leary about installing the hooks without an extra piece of wood attached to the wall. The spacing of our hook placement does not allow them to be anchored by the stud. Thanks for any help and I love how this room turned out!
Hi! We would recommend mounting with a screw and anchor. You just need to fin d the right anchor to fit the screws that come with the hook. Purchasing a screw and anchor kit will not only give you what you need, but will absolutely come in handy with future projects. Check out this one here:
https://rstyle.me/+NTkXeaDYsO0AI_Iah72qAw
Let us know if there is anything else we can help with! And please do share the photos of the finished project! We can not wait to see it.
Hi! Love this space! Can you tell me what the bench height is? I’m designing a similar plan and not sure how tall to go. Thanks!
Hi Jenna. We do all of our benches between 18″ – 22″, depending on where we are placing it. For a mudroom space you can go higher or lower than your standard seat height, but in a banquette build we would match the height of the dining chairs being used at a table. Hope that helps!
Hi there, did you glue together two pieces of plywood for the legs? Also, what type of nails/glue did you use to connect the pieces? I am trying to build just the bench part of this design so any additional details would be very helpful. Thank you!
Hi Rachel
We just used one piece of plywood for each leg, which were connected using construction screws (screwing from the plywood seat base and into the tops of each leg). Hope that helps!
Hi! My husband and I are attempting this project in an almost identical space, and while I was once able to pull up the post where you got into the specifics of building this space, I no longer can. Could you give me the link to the post you did about how/when you built this space? Thanks!
Hi Kate,
This is the only post we currently have on building a mudroom. Although we’ve been thinking of creating a few more to help with the process!
Looks Fantastic!
I am designing a similar mudroom, and I had a question about attaching the oak boards of your bench to the plywood frame. It appears they are nail gunned in. Did you use any adhesive or screws as well? Second, is there any concern about the expansion of the oak wood on the bench?
I’m a novice and learning as I go. I appreciate your help!
We used wood adhesive and brad nails to attached the oak. You are always going to have expansion in the wood, however the poly finish will help keep everything tight!
Looks Fantastic!
I am designing a similar mudroom, and I had a question about attaching the oak boards of your bench to the plywood frame. It appears they are nail gunned in. Did you use any adhesive or screws as well? Second, is there any concern about the expansion of the oak wood on the bench?
We used wood adhesive and brad nails to attached the oak. You are always going to have expansion in the wood, however the poly finish will help keep everything tight!
Hi, just wanted to say thanks for this inspiration. I built this in my own entryway over the summer. I love how it turned out!
Photos: https://photos.app.goo.gl/SkrtEf7sTE3j3fE97
I just have to buy boot mats before winter.
Jeremy,
This looks absolutely AMAZING! We are do glad we could be an inspiration to your build.
This is so inspiring! Beautiful work. Might I ask how much did this project cost?
Hi Tori,
We are so glad you like our work. Each of our projects vary in cost depending on an array of variables: design hours, labor, material cost, ect… We don’t share openly what clients pay for projects. If you were to do this project on your own it would be the cost of material and your time.
Thank you,
Danielle
How deep do you make the benches?
What color stain are you using? I didn’t see it mentioned anywhere in the post.
Do you have a complete lists of supplies? I see the list but it doesn’t say how many of each board.
Hi Michelle,
The reason we don’t have a full list of quantity is because this was custom built for the space based on the measurements of the room. Your space will be different than this one. Hence us just listing the supplies and not the actually amount.
I love this! Is there anyway you could send me the blueprint so I can show my contractor?
50 Comments
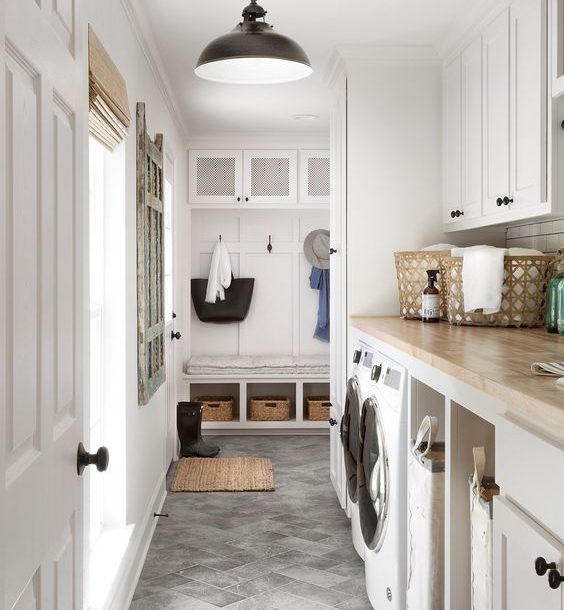
Wow!! It’s looking gorgeous! I love those built-ins! They’re gorgeous!
Thank you Emy! These built-ins are about to get even better.