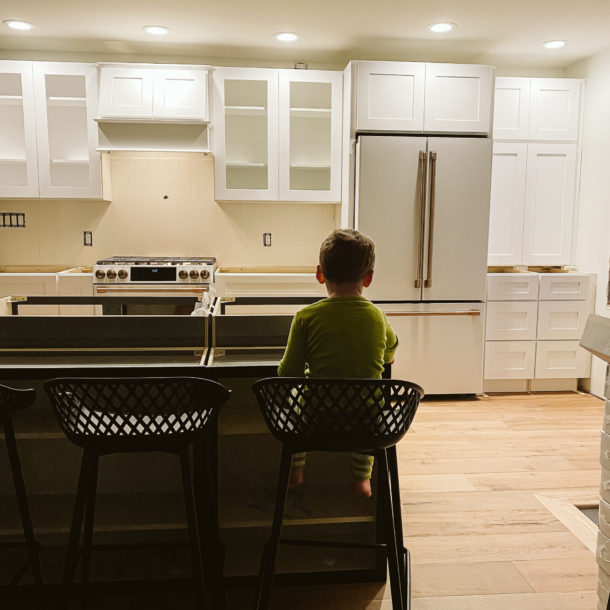
Well, here we are. Week 6! We’re well past the midway point, and honestly had planned to be revealing our space this week. But our reality as business owners, a family, a nation and a world has shifted our plans. Last week we all took a pause from content and shifted our focus to listen, learn, reflect, declutter our feeds and speak our views on the racism pandemic in our country. It was necessary, and will continue to be a priority for our family. But the renovation had to continue and we have a ton of things to catch you up on!
Before we get into all of that, if you aren’t caught up with our full project yet make sure to get all caught up!
Week 1 – Space plan, Design Board and over all inspiration
Week 3 – Drywall, Paint and Design
Week 4 – Flooring, Cabinets, Appliances and our Dining Nook
Also, if you’re finding us for the first time from the One Room Challenge, welcome! We’re Danielle and Michael Gutelli! And together, we’re Clark + Aldine.
Clark + Aldine is named after the Chicago streets where we first met, and was born out of a love for purposeful design and everyday functionality. What we didn’t know then was that our passion and design influence would continue to grow, and we would soon leave our established careers to pursue Clark + Aldine full time. But like they say, when you know, you know! Learn more about us.
The first project we tackled after the cabinets and appliances were in was countertops. As you may recall from Week 4 COVID-19 had a significant impact on the construction and fabrication business, therefore our countertop supplier and fabricator was forced to halt business. With no running water in our kitchen we had to think fast, and we came up with an incredible solution. We fabricated our own countertops using red oak plywood. That’s right, for 6 weeks we lived with red oak plywood countertops…and it was amazing! The perimeter tops were easy with simple cuts and a slide into place. The island was a full 4’ x 8’ sheet with a cut out for the sink, faucet and garbage disposal switch. While our sink is an undermount we dropped it right into the cutout and it worked perfectly.
The boys mounted each countertop with 3M double sided tape which held it perfectly, We tried to pull them up and it was really hard, which meant it did its job. Once they were securely in place we finished them with a coat of matte polyurethane.
While we can’t get countertops at the moment this is not going to hold us up on creating a truly functional space. Adding hardware to our cabinets was a must. Installing cabinet hardware can run smoothly as long as you are properly prepared. Here’s our step by step guide on how to properly install hardware! Hardware is the jewelry to your cabinets picking the right hardware creates the overall look and feel you are going for. To pull off the perfect touch, you need to take the time to figure out exactly what you want to have in your space. We’ve got a full comprehensive hardware guide to help you through this process.
We love the look of mixing metals and with two different color cabinets in our space this really allowed for us to play with the hardware even more. We have 4 different styles of hardware going into our kitchen and 6 different sizes of hardware to truly complete the look we are going for. Below is a list of what hardware you will see over the next few weeks with an explanation of where we are using each.
Menlo Park, Pull, Signature Satin Brass, 4” – These will be used on a set of 15” base cabinets, each of which have 3 drawers and the 9” pull out cabinet next to the range.
Menlo Park, Pull, Signature Satin Brass, 6″ – This is the main pull you will see throughout our perimeter wall on mostly all of the uppers and base cabinet doors and drawers.
Menlo Park, Pull, Signature Satin Brass, 8” – We have 2 8” pulls for our counter mounted pantry upper doors.
Menlo Park Collection 1-1/4 in. Round Knob, Signature Satin Brass – These little guys are on the upper cabinet that is directly above our walkway into the hallway. This cabinet ties the kitchen to our new coffee bar.
Finestrino, Pull, Rectangle, Matte Black, 5 7/8″ x 2 1/8″ – These pulls are installed on 4 faces of the kitchen side of our island. The knife drawer, pull out trash and recycling, and two pull out drawers in front of our sink for things like sponges.
Aria, Pull, 5 1/2″ – We added a different pull for the doors underneath the sink…they’re rad.
Our breakfast nook area is really coming together. The bold Travertine wallpaper from Tempaper continues to make such an amazing impact on the space. Now, we’ve gone and lined the built-out with the Tile Shop’s Firehouse Brick. While the brick itself is absolutely stunning against the Travertine wallpaper is just too much. We needed to neutralize the brick while still allowing the texture to show through. To do this we primed and painted the Firehouse Brick with Sherwin Williams Alabaster. Michael created our floating bench to optimize on seating in the space. We finished the bench with Minwax Special Walnut. Currently we have a small white table we’ve purchased to accommodate our family and allow for us to live through this unexpectedly long renovation. While I love the cb2 table it feels too small for the space. Working through what’s going to land there permanently. Promise to bring you along on that journey. Having the appropriate size table is essential.
We seem to have a running theme in this house with couch deliveries. This is the second time that we had to remove a piece of a wall in order to get a couch inside the house! A few years back we ordered a couch for the Living Room and the only way in was through our back door (which is in the office) and into our dining space. We got it inside the house but needed an extra ⅝ inch to get it through the walkway from our hallway into our dining space, so off came some casing. This time was much smoother but we still had to take out a portion of our post at the end of our upper staircase, which we placed right back in after the couch was in place. Good thing we didn’t get to the finish portion of that post!
Once we opened up the space we quickly realized our existing furniture was no longer going to work with our newly designed layout. Our current rug was oversized for the space running into the new island. The chase on our current sofa was taking up valuable seating space and the overall movement in the room. Not to mention our two chairs had nowhere to live now that the wall was gone! You guys can see the before of our living space here.
We are working with Apt2b for most of our living room furniture and you guys the quality of every item we’ve received is so good! Our sofa is absolutely perfect. We landed on the Dylan leather sofa in chestnut! Our entire family can sit on it which makes our hearts so happy and the brass detailing on legs is just too good.
We paired the sofa with the Ryder accent chair and Aikin coffee table to create a perfect marriage and harmony together inside our space. We’ve already styled a small portion to make our home feel more like us as we continue to live through this renovation. Loving these planters and this vase! We cannot wait to show you even more of our living space soon!
Art is typically an element we place near the end of a project. But we had to put something on the walls to bring us some joy, and honestly free up space on the floor from where the pieces were sitting. We received some new pieces from Minted, including our large living room and hallway pieces. The living room piece is titled “Le Mirage” and adds some incredible depth and color to the space. It is the perfect piece for a wall that went from bland to being able to stand on its own with some incredible detail (you’ll just have to wait to see all of it).
The piece we have in the hallway is titled “Mother Embrace” and it is stunning. We can see this from inside our office and it is a reminder to us how important family is. We originally planned on a gallery wall in this space but decided a single larger piece is what we needed.
We wanted to make sure we had some art in our coffee bar. With all glass front uppers we have the opportunity to truly style our cabinets with items outside of the traditional dinnerware. We found this perfect piece titled “Nature Does Not Hurry” and at 8” x 8” it sits dominantly in the cabinet without feeling forced or jammed in a space where it doesn’t belong.
If you’re ever in the midst of a renovation project and hit a wall or an unexpected delay, put some art on the walls. It will bring your space to life and give you some peace in the midst of chaos.
Next week we are going to tackle lighting and all of our molding which includes all new baseboards and shoe, door and window casing, crown molding, stair nosing, stair treads, risers, handrail and our first ever knee wall! And then we have all of the finishing touches like paint, decor and styling, and…oh yeah, countertops, backsplash, pot filler and the cabinet stack and crown molding that can not be installed until the countertops are in.
So be sure to check back in next week to see where we are as we race to the finish line on this project! And check out the other 19 amazing Featured Designers taking part in the Spring 2020 One Room Challenge!
A Glass of Bovino | Beginning in the Middle | Beth Diana Smith | Clark + Aldine | Coco & Jack
Deeply Southern Home| Design Maze | Dwell by Cheryl | Erika Ward | Home Made by Carmona
House of Hipsters | Hunted Interior | Kandrac & Kole | Kate Pearce | Katrina Blair | Liz Kamarul
Veneer Designs | Rambling Renovators | Renovation Husbands | Studio Plumb | Media BH&G
You can follow us along on our journey over on Danielle’s Instagram page. And stay tuned because tomorrow we are dropping a brand new podcast series inside our Stay True Podcast with all kinds of behind the scenes insight and interviews you aren’t going to want to miss. Subscribe today on Apple or Spotify and you’ll get the notification right to your phone!
wow that’s progress Danielle!! love the new layout with a furniture refresh and the artwork you’ve picked are perfect in the space. Glad to hear they give you so much joy when you look at them everyday. 6 different style of hardware in your kitchen … i can’t wait to check it all out! good luck at week 6 … we are almost there!!
Tim,
Thank you so very much! We are so excite to watch this space come together.
Thank you so much Deb! We cannot wait to show you more.
[…] Glass of Bovino | Beginning in the Middle | Beth Diana Smith | Clark + Aldine | Coco & […]
[…] Glass of Bovino | Beginning in the Middle | Beth Diana Smith | Clark + Aldine | Coco & […]
[…] Glass of Bovino | Beginning in the Middle | Beth Diana Smith | Clark + Aldine | Coco & […]
[…] Glass of Bovino | Beginning in the Middle | Beth Diana Smith | Clark + Aldine | Coco & […]
Clark + Aldine is fully licensed and insured.
© 2024 Clark + Aldine | Interior Design Websites by Formcode | Site Map · Privacy Policy · Terms and Conditions
Leave A Reply
You guys!!!!! I love love love the wallpaper. It’s stunning!
Kyla,
Thank you so much!!! I am so excited how everything is coming together.